![]()
|
|
|
LABORATORY SCHEDULE Lab Number Date Topic
1. Sept 4 Experimental Technique/ Data Presentation 2. Sept 11 Electrophoresis of DNA 3. Sept 18 Effect of Endonucleases on DNA 4. Sept 25 Presentation of Data 5. Oct 2 Basic Cell Culture Techniques 6. Oct 9 In Vitro Investigations 7. Oct 16 Presentation of Data 8. Oct 23 The Hill Reaction of Photosynthesis 9. Oct 30 Factors that effect the Hill Reaction 10. Nov 6 Presentation of Data 11. Nov 13 Introduction to Chlamydomonas Flagellar System 12. Nov 20 Investigation of Flagellar Regeneration 13. Dec 4 Presentation of Data
LAB 1 HOW CAN WE SEE IF OUR DATA IS ANY GOOD? I. Introduction A major component of what we are trying to achieve in the laboratory portion of this course is learn how to design, perform and analyze experiments. We want to be able to determine if the data we generate from these experiments means anything, or is statistically significant. Ok, so let’s say we have generated some data in the lab in a cleverly designed experiment. Statistics allows us to express our degree of belief or disbelief in the reliability of our data as a probability rather than as a vague general statement. There are a number of options to use statistics to quantify our data. In this class we will be using just a few of some of the more common statistical procedures including t-test, chi-square, ANOVA and regression analysis. So, what kinds of questions can statistics answer about our data? 1. How reliable is our data? 2. What is the probability that the differences in the observed data and the data expected on the basis of your hypothesis are due to chance alone? You have already been exposed to some concepts in statistics in, Biology 151, 201, 203 and others. Concepts like the mean and standard deviation of a group of measures and how to look for significant differences with the T-test and Chi square procedures. A key concept in experimental science is the notion of hypothesis testing. This is one of the most common uses of statistics in biology. Let's start with a definition of something called a null hypothesis (Ho). The null hypothesis is the one under test. It is called the null hypothesis because it assumes that there are no differences between the experimental and the control condition. Let's make up an example that uses the scientific method to come up with a null hypothesis. Say we first we examine some cells in culture and notice that the pH is different in the culture medium of two tissue culture flasks. When we look further it appears as one flask has more cells present than the other. An example of a possible null hypothesis is given below:
Ho = There are no differences in cell number at different pH's.
Again, recognize that the null hypothesis states that there are no differences between two groups for a given variable (hence, null), in this case pH. OK, let's say we generate some data and want to use the t-test to look for significant differences.
II. T-Test For example, let’s say that we want to look for significant differences between the means of two groups of samples. One way to do it would to be use hypothesis testing with the following null hypothesis: Ho : the means are not significantly different. The t-test is one of the classic tests for comparing the means of two paired or independent samples. These tests are 2-sample tests for matched and independent samples that are designed to look for possible differences between the two sample means. Again, the null hypothesis for this test is that the difference between the means of the two samples is 0, and that any difference observed is simply due to chance. There are a number of basic assumptions for the t-tests, as most statistical procedures. The t-test assumes that the two samples are normally distributed, have similar variances and have at least 10 observations per group. In our experiments we may have less than 10 observations, but appreciate that your data will be stronger with more observations. The t-test looks at means and variances around the mean to see if the two groups of measures are significantly different from each other. With the t-test, you come with a null hypothesis, which states that there is no difference in the mean values in the two groups. For example, if you take out data from heights of parents and offspring, you would have a null hypothesis that says "there is no significant difference between the mean heights of the parents and offspring".
Parents (x) (x -x)2 Offspring (y) (y - y)2 (x - x) (y - y)
59 (-3)2 63 (-1)2 -3 x -1
61 (-1)2 65 (1)2 -1 X 1
61 (-1)2 61 (-3)2 -1 X -3
63 (1)2 65 (1)2 1 X 1
66 (4)2 66 (2)2 4 X 2
310 28 320 16 14
It is calculated by a number of steps:
1. Generate a null hypothesis that there is no difference between the means of the two groups. We want to see what the probability that is associated with accepting or rejecting our null hypothesis. This is what the t-test tell us.
2. Use the formula for calculating the t-statistic
t = x - y = 62 - 64 = 2 = 2 = 1.35
Vx/ n + Vy / n 7/5 + 4/5 1.48 + 0.8 1.48
3. Calculate the degrees of freedom df = (nx - 1) + (ny - 1) = 4 + 4 = 8
4. Look up calculated t-statistic with that degree of freedom to look for significant differences. A t-statistic of 1.35 with 8 degrees of freedom from the table gives a probability about 0.10. Smaller probability numbers support us rejecting our null hypothesis, which means that there is no significant difference between the values of the two means. A probability of 0.20 means that if we reject our null hypothesis, we will be wrong 20% of the time. This is called a Type I error, rejecting a true null hypothesis. You could say that you will be correct in rejecting the null hypothesis 90% of the time. You will be using SigmaPlot software to analyze your t-tests.
III. ANOVA Say you are doing an experiment that has more than two groups, and you wish to see if they are significantly different. One-way analysis of variance (ANOVA) is another procedure used to compare the means of three or more independent samples. When you discover that three or more means are different, further testing is indicated to identify exactly which pairs of means differ significantly. ANOVA is a test for independent samples that evaluates a possible difference between their means. The null hypothesis for all these tests is that all of the means are equal. Any differences between means that are observed are simply due to chance.
IV. Chi Square There is another way we can compare two measures of phenotype from two groups. This measure is the analogue of the chi-square test. In the chi-square test we compared observed ratios to the expected ratios. The hypothesis we were testing was that observed values reflect the expected values with a certain degree of confidence. The first step in a chi square analysis is to come up with a hypothesis about the expected ratio. X2 = (obs - exp)2 expected Accept with larger probabilities, > 0.95 Reject with smaller probabilities < 0.05
V. Regression Analysis Another procedure that many of you are familiar with is linear regression. It can be used to show relationships between two variables. Simple linear regression is a procedure used to predict an outcome (dependent) variable from a single independent variable. This procedure is based on the calculation of the least squares linear regression equation. Linear regression is a procedure for matched samples that attempts to predict one variable from another variable. In some instances one can do hypothesis testing using linear regression. The usual null hypothesis is that there is no relationship between the two variables and therefore the slope of the regression equation will be 0. Any slope different from 0 that is observed is simply due to chance. For regression analysis to be valid it is assumed that the population of observations are normally distributed (parametric) and there are 10 pairs of observations. In reality we often use this analysis on less than perfect data with fewer than 10 observations.
Graphing and Statistics Software The previous discussion was to give us a sense of what we are doing when we are using computer programs to do our data analysis. I know many students are familiar with the graphing and statistical functions available in Excel. For this course I would like to introduce you to another graphics/statistical software package. You will be required to use SigmaPlot to do all our data analysis and graphics. Here are a few examples you can use to see how to enter data and run SigmaPlot. In the first example, let’s say that you have exposed cells in culture to 0.5 mg/l of an experimental drug. The data you have generated from your experiment is listed below. Generate a hypothesis and determine if the mean value for the treatment and control groups are significantly different (0.05 probability).
1. Open SigmaPlot 2. A data worksheet should come up, enter the data in three columns 3. Once the data is entered, go to the “Statistics” pull-down and select “compare two groups”, then “t-test” 4. The first screen is for data format, we will use “Raw” (non-transformed or modified data, just what we got). 5. The next screen has you select the two columns of data you want to compare, so just click on column 1, then column 2. 6. The program will then calculate the t-statistic, and the probability associated with there being any differences between the samples. The output should look something like this:
t‑test
Data source: Data 1 in Notebook
Normality Test: Passed (P = 0.027)
Equal Variance Test: Passed (P = 0.755)
Group Name N Missing Mean Std Dev SEM
control 10 0 2277.300 60.163 19.025
0.5 mg/l 10 0 2104.900 50.648 16.016
Difference 172.400
t = 6.932 with 18 degrees of freedom. (P = <0.001)
95 percent confidence interval for difference of means: 120.152 to 224.648
The difference in the mean values of the two groups is greater than would be expected by chance; there is a statistically significant difference between the input groups (P = <0.001). This is the probability of making a Type-I error, or rejecting a true null hypothesis.
Power of performed test with alpha = 0.050: 1.000 The power is the probability the test will detect a difference, the closer it is to one, the more sensitive the test.
For the next example, we want to use the same data set, but this time we want to see if there is any significant differences between any of the three groups tested (control, 0.5 mg/l, 1.0 mg/l). Once again, generate a hypothesis and SigmaPlot’s statistical features to look for any differences in the mean value for all three groups at a alpha of 0.05. Use the “Statistics” pull-down and select “Compare many groups” then select “ANOVA”, you should come up with something that looks like this:
One Way Analysis of Variance
Data source: Data 1 in Notebook
Normality Test: Passed (P = 0.087)
Equal Variance Test: Passed (P = 0.781)
Group Name N Missing Mean Std Dev SEM control 10 0 2277.300 60.163 19.025 0.5 mg/l 10 0 2104.900 50.648 16.016 1.0mg/l 10 0 2024.400 68.181 21.561
Source of Variation DF SS MS F P Between Groups 2 333868.067 166934.033 46.227 <0.001 Residual 27 97501.400 3611.163 Total 29 431369.467
The differences in the mean values among the treatment groups are greater than would be expected by chance; there is a statistically significant difference (P = <0.001).
Power of performed test with alpha = 0.050: 1.000
All Pairwise Multiple Comparison Procedures (Tukey Test):
Comparisons for factor: Comparison Diff of Means p q P P<0.050 control vs. 1.0mg/l 252.900 3 13.308 <0.001 Yes control vs. 0.5 mg/l 172.400 3 9.072 <0.001 Yes 0.5 mg/l vs. 1.0mg/l 80.500 3 4.236 0.016 Yes
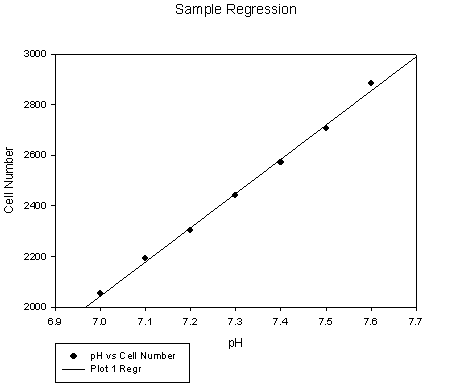
SigmaPlot Next let’s look at the graphics component of SigmaPlot. In this example, you have just completed an experiment in which the pH of the culture media was varied and you recorded the number of cells at the various pH's. There are a couple of things that you can do with this data. First you might be just interested in generating a line graph of this data and labeling the axis. But you may also be interested in finding out if there is a relationship between the pH and the number of cells. You could do a regression analysis between the independent variable (the one that you have control over, this is normally plotted on the X-axis of the graph), or the pH and the dependant variable. Note that you don’t have the 10 samples, but you can still get meaningful data. Here is some data: pH Number of Cells
7.0 2054 7.1 2194 7.2 2302 7.3 2440 7.4 2570 7.5 2707 7.6 2885
To do a regression plot and analysis to look for relationships you can open SigamPlot and: 1. Put an arrow on column 1 and double click, then type in pH. This will label the column of data. Then go to column 2 and do the same thing for the data on cell number. 2. Once you have entered your data, there are a number of ways to generate a graph, here is one easy approach. Go the left of the screen and select the image of a scatter plot (upper left graph image). Then select a regression-type plot (upper right graph image). 3. Next select the form of your data, in our case it is “XY pair”. 4. Select your independent variable, or the X-variable, by clicking on the column that contains the data, in our case it is pH. Then select the data for the Y-axis by clicking on cell number. 5. Hit “finish”, a graph will be generated. You can edit the graph labels by double clicking on the name of the graph and axis to rename them as you wish. 6. Now go to the toolbars at the top of the page and select “statistics”, then regression. You can then highlight the results which should look like the data below.
The data below is from the regression results. It gives the values for the straight line regression line that best fits the data. The equation is in the form of Y = b0 + b1x. (I learned this equation as Y = mx + b). Where Y is the dependent variable (cell number), b0 is the intercept when X=0, b1 is the slope or the increase in Y per increase in X, and X is the independent variable. R is the correlation coefficient, while R2 is called the coefficient of determination. R-values are measures of how well the calculated regression equation describes the data. R-values range from 1 to 0, with 1 being a perfect relationship, and 0 being no relationship. The column of function values just gives you predicted cell numbers at different pH’s using the regression equation that was generated from the data you generated.
Plot 1 Order 1 Curve 1: Cell Number column 2: Coefficients: b[0] -7422.9642857141 b[1] 1352.5 r ² 0.9964249545
Function Values: x f(x) 7 2044.5357142857 7.012 2060.7657142857 7.024 2076.9957142857 7.036 2093.2257142857
GENERAL PROCEDURE FOR GENERATING ERROR BARS IN SIGMAPLOT There may be times when you don’t want to make a simple line plot, but because you have multiple measures of a single point, you want to have error bars to give a sense of just how good your data is. Again, there a number of ways you can do this procedure in SigmaPlot. Here is one: I. Enter you data in the format below assuming that you have five time points, each with three corresponding absorbance values (a lab that uses spectrophotometer absorbance’s). Notice that the first column of your data is the 5 time points. Also note that there are three replicate absorbance reading for each of the time points. It is very important to enter the data in this format to generate the graph.
Time (min) Abs-5 min Abs-10 min Abs-15 min Abs-20 min Abs-25 min
1. 5 .33 .35 .32 .44 .55
2. 10 .22 .33 .27 .34 .44
3. 15 .25 .30 .36 .23 .66
4. 20
5. 25
II. Create a graph as before except select many Y vs X, then select error bars for the Y-Axis (assuming absorbance is on the y-Axis). III. Select column averaging and 95% Confidence Interval (or you can use standard deviation), then select OK. IV. Select worksheet as your source of data if you have 10 or less data points. Select pattern if you have more than 10 data points. Then select your x-column and which columns you want your y-values to be located. V. Select time as your x-axis, select absorbance as your y-axis. Now select the different absorbances as your y-axis until you have used all of your absorbances and hit escape when you are done. Note that you should have the same number of absorbances as time points. SigmaPlot will calculate the statistics on our three absorbances and place error bars on the plot for you. AN EXAMPLE OF CREATING GRAPHS WITH ERROR BARS You have designed an experiment to test the effect of colchicine on cell number. Your null hypothesis (Ho) is that colchicine has no effect on cell number. You set up 9 separate T-25 culture flasks and equal numbers of cells to each flask. Three flasks you designate as the control and these get no drugs. Three of the flasks get 0.1 mg/ml colchicine and the remaining three get 0.5 mg/ml colchicine. At the end of four days you harvest the cells and count the number of cells in each flask. You now have a data set that consists of three counts of cells for the control group, the 0.1 mg/ml group and the 0.5 mg/ml group. Your raw data would look something like that shown below. Note that it is important to enter the data in this format where the different treatments are along the top and the replications of the treatments are along the side. SigmaPlot needs the data in this format for proper analysis. Control 0.1 mg/ml 0.5 mg/ml
(Cell Number x 104) There are a number of ways you can analyze this particular data set in an attempt to accept or reject your null hypothesis. For example you could use the ANOVA procedure to compare the differences within each group to the differences between each group. Instead for this experiment, you chose to do your analysis graphically where you plot the cell number against the concentration of colchicine. You wisely have designed your experiment so that you have replicates in each of your groups so you have some measure of variability within each of the groups. One way to do your graphical analysis is to plot the mean and the corresponding 95% confidence interval for each of your three groups. This would take the form of three points representing the mean values with error bars around the means. These points can be connected by lines to show any trends in the data. Any point where the 95% confidence intervals do not overlap between adjacent mean values can be said to be significantly different from each other with an alpha of 0.5. That is you would have a 5% chance of making a Type One Error (see first lab). It should be noted that this concept of overlapping confidence intervals can be applied when comparing multiple plots to each other. You chose to use SigmaPlot for your data analysis and you follow the protocol described below. 1. Enter the data in four columns as shown on the accompanying printout from the SigmaPlot data worksheet. Note that the proper format of the data entry is extremely important for getting an analysis that makes any sense. You must think about what it is that you are trying to have the software package do to your data. In this instance, you want to plot the concentration on the X-axis against the mean values of column one (control), two (0.1 mg/ml) and three (0.5 mg/ml). Control 0.1 mg/ml 0.5 mg/ml Concentration
2. Select the “Line/Scatter-Plot” image from the graph options on the left side of the page. 3. Then select “Simple Line and Scatter with Error Bars”. 4. A window will come up that gives you an option of how the error bars are calculated. Because you have entered the data with replicates in columns you can select “Column Means”, which I think is the default option. 5. We will be using 95% confidence intervals for the upper and lower values, again, I think these are the default options that come up, then hit “next”. 6. The data format will be “X with Many Y”. That is there will be a single X value for each point, and the many Y will be the multiple column replicates. Select Next 7. This is where you need to define the X-values for the graph. These are the Concentrations, so click on that column. After you have selected the X-value, you need to click on the on three columns with the different concentrations. 8. SigmaPlot will then make a graph of the mean values of the three columns with error bars representing the 95% confidence interval around each of the mean values. You can then add lines, grids, axis labels and anything else you want to create a graph that looks something like the one shown below. Note that you can add multiple Plots to a given graph when you are comparing a number of different data sets. You now look at the graph you have generated and try to relate it back to your Ho. Can you reject of accept your null hypothesis that there is no significant difference in cell number between control and cultures with colchicine. When you look at the plot it appears as if there is overlap between your control and 0.1 mg/ml groups. Whereas there does appear to be a significant difference between the 0.1 mg/ml group and the 0.5 mg/ml group. How can you use this data to analyze your findings and accept or reject your Ho?
FORMAT FOR LAB WRITE-UPS You will be doing four lab modules over the course of the semester, so you will end up with four lab write-ups and four powerpoint presentations. The format for your lab write-ups and PP presentations we will be: 1. Abstract 2. Introduction (start early!) 3. Methods/Experimental Design 5. Results including all your raw data 5. Conclusions 1. Introduction - As much as you think you have come up with an original, totally clever idea, chances are someone has already done it or something very similar. The only way you are going to know this is to have some background into your area of investigation. The time spent doing this is time well spent. It often gives you new ideas or ways to approach the experiment. It may also save you from making mistakes someone else have already done for you. There are a number of useful resources for literature review. Probably the most useful to start with is the libraries on-line resources that link to databases like PubMed (http://www.ncbi.nlm.nih.gov/pubmed/). This will allow you to search for papers and abstracts. 2. Methods - An experiment can be simple or complex. It need not necessarily be complex to represent an elegant approach to test your hypothesis. In many cases our experiments will require the mastery of a specific technology such as electrophoresis. Our experiments will always have a control and an experimental group(s). The experimental group will vary in one (or a very few) variables. A reality of research is the difficulty in planning an experiment within the limits of your resources (money, supplies, equipment and time). What is required to design and perform a good experiment? Include your experimental design matrix. - Careful planning of all steps involved prior to the experiment (details!) - Manual dexterity and accuracy of measurement/use all your skills - Patience, experiments in the "real world" don't always the first time through - Objectivity or lack of bias (very difficult) 3. Results - This represents a organized presentation of the data (numbers, colors, growth, pH, etc) you have collected during your experiment. Your presentations should have charts and graphs of your data and analysis. Unbiased (unfudged) data collection is essential in science. You will not be penalized for not getting the "right answers". It is the process we are concerned with and the development of scientific integrity. Also some of the very important discoveries have been made by having the data say something different than the experimenter expected or wanted. It is very important to include all your “raw data” in your presentation/report. Data analysis will often require basic statistical analysis. I will describe this in a later section. In addition graphical interpretation of the data will also be utilized if possible. Forethought about how your data will be analyzed and utilized will often drive the direction of your experimental design. You should be thinking about how your experiment directly answers your hypothesis. 4. Conclusions - Based on the analysis of your data you should be able to reject of or accept your hypothesis. You should also discuss how your results fit in to the larger picture of work that is occurring in the field under study. It should also include a discussion on what further work can be done. Often answering one question gives rise to many others. All presentations will PowerPoint-based which allows you to input graphs, tables and charts from our graphics packages as well as images of the internet. Rubric for Presentations
|