![]()
|
|
LABORATORY SEVENDNA FORENSICS OVERVIEW: Methods for identifying individual living things, including humans, have always been of great interest. In order to make an individual identification system work, we must discover some attribute of the organism that is unique for each and every distinct individual or person. For example, the identification of individual humans in criminal cases has historically relied on fingerprints, and is based on the knowledge that no two human beings have the same pattern of ridges and grooves on their fingertips if they are examined carefully enough. But, as you might suspect, many cases arise in which the elements of this system, decipherable fingerprints, are not available. The ideal system would be one that could identify an individual from very small samples of the individual's tissues, such as hair follicles, body tissues, or samples of body fluids (blood, saliva, and semen) and even on dried material, such as blood stains or mummified tissue.
OBJECTIVES OF LABORATORY: · To understand the digestion of DNA molecules using restriction enzymes. · To learn the biological technique of gel electrophoresis. · To understand the principles behind DNA fingerprints. · To make and analyze a set of DNA fingerprints.
INTRODUCTION: You are learning from your studies of mitosis, meiosis and Mendelian genetics that it is so unlikely that any two individuals will be genetically identical that we can state with confidence that the hereditary material of every human is unique. Identical twins, two individuals resulting from a single fertilization, are an exception. If there were some way to detect that uniqueness, we would have a method for individually identifying every human alive! The technology of molecular biology has provided us with such a system, called DNA fingerprinting or typing. The uniqueness of each individual's genetic makeup has its foundation in the molecule Deoxyribose Nucleic Acid, or DNA, which composes the genes. DNA consists of sequences of subunits called nucleotides arranged in long, linear chains. A pair of such chains makes up each DNA molecule (the double helix); the molecules may be millions of nucleotides long. While there are only four different nucleotides, the large number and arrangement of them in each DNA molecule ensure that there will be more than enough complexity to allow each of billions of humans to have distinct sequences. Thus, if we have the sequence of an individual on file and can match it to DNA found at, for example, a crime scene, this makes it almost certain that that individual was present at the scene. Early in the development of molecular genetics, it was discovered that many micro-organisms, especially bacteria, have restriction enzymes, which can digest, or break up, DNA molecules. Restriction enzymes sit on a DNA molecule and slide along the helix until they recognize specific sequences of base pairs that signal the enzymes to stop sliding. The enzymes then digest (chemically separate) the DNA molecule at that site – called a “restriction site” – acting like molecular scissors, cutting DNA at a specific sequence of base pairs. When we expose DNA to restriction enzymes, the molecules will be cut into a number of fragments. The number and size of the fragments depends on where, and how many times, the recognition site is found in that particular DNA. With the millions of nucleotides in each DNA molecule, it is not surprising that the distribution and number of specific recognition sites is unique or very nearly unique in every individual's DNA. Therefore, the fragments resulting from such a treatment will be themselves unique in number and size for each individual. And even if two individuals were closely enough related so that they could produce nearly identical arrays of fragments with one enzyme, there are 1499 others to try—eventually an enzyme, or combination of enzymes, will reveal the inevitable differences. Let's walk through a hypothetical case. Imagine that a female student from another college was assaulted while visiting Hampden-Sydney. The description she gave police of her attacker was vague; it fit about a dozen HSC students, three of whom were known to have been in the vicinity of the crime scene at the time. The victim was able to scratch her attacker's hand, and tiny bits of skin were removed from under her nails. DNA was extracted from these bits, and through a process called polymerase chain reaction, or PCR, the tiny sample of DNA was amplified many times, providing enough for testing with restriction enzymes. After exposure to the enzymes, another technique called gel electrophoresis (which you'll be doing in this lab) is used to separate the fragments according to size. The technique is based on the fact that DNA carries a slight negative charge and will be attracted to the positive pole in an electrical field. Smaller pieces will travel faster because they can negotiate the pores in the gel with more ease. When the current is turned off, the fragments will be strung out along the gel in order of size. The result is a pattern on a small slab of gel that will be unique to this DNA—this is itself the DNA fingerprint. Of course, the fingerprint is useless unless it can be matched to a known fingerprint. Therefore all of the suspects must agree to submit a swab of cheek cells or a small quantity of blood that will undergo the same procedures. We hasten to add that no one in the United States can be compelled to provide the sample unless a judge has issued a subpoena for sampling a suspect. If the fingerprint derived from any of the blood samples matches that from the skin fragments, the attacker has been identified. Of course, our legal system requires that matters of guilt and innocence be determined by a jury, and not by a laboratory test. DNA fingerprinting only provides evidence for the jury's consideration. Another situation in which DNA fingerprinting has proven valuable has been in paternity suits. The mother of a child may be able to use this technology to prove the identity of the father of the child from among an array of potential parents. Similarly, refugee children can be reunited with their biological parents even though many years have passed since their separation, and they may find one another mutually unrecognizable visually. Remember that a child inherits half of its genetic information, and thus half of its DNA, from each of its parents. Thus the recognition site patterns of the child will be a mixture of those of both its parents, but will not resemble particularly closely those of unrelated individuals. In other words, all of the DNA fragments in the fingerprint of the child that do not match the mother's fingerprint will match the father's. In this way an almost unequivocal identification can be made. But please remember that such suits are settled by the courts, and that DNA fingerprinting is only submitted as evidence. In this laboratory you will study the technique of DNA fingerprinting through a simulation. The DNA is real but not human, but the fingerprints you will make are genuine and will closely resemble the real thing. The analysis of the "fingerprints" will be up to you!
PROCEDURE:
1. Each group will be provided with six small tubes containing DNA samples, as follows:
Tube Contents 1 Suspect 1, S1 2 Suspect 2, S2 3 Suspect 3, S3 4 Suspect 4, S4 5 Suspect 5, S5 6 Crime Scene, CS
You will also have an additional tube of restriction enzyme mix labeled ENZ that is on ice and a tube of loading dye marked “LD”.
2. Read the Protocol for Using Pipettes, which is located after the Assignment at the end of the lab, and practice using the pipette before proceeding with the next step.
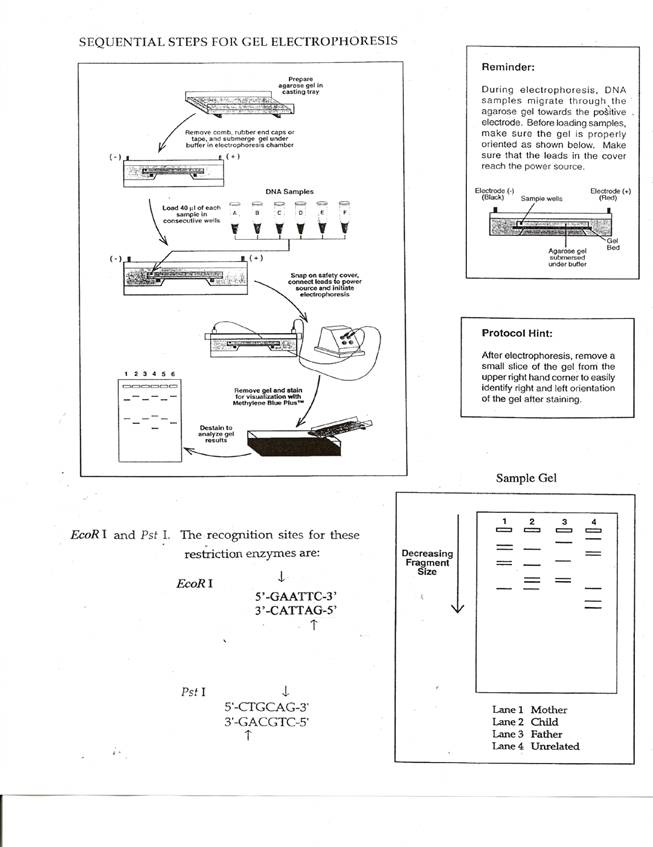
3. Pipet 10 microliters of enzyme mix (ENZ) into the very bottom of each DNA sample tube. Use a separate tip for each tube of DNA. This is actually a mix of two enzymes, EcoRI and PstI. The recognition sequences are included on the page describing gel electrophoresis.
4. Cap the tubes and spin in the microcentrifuge for 20 seconds. This mixes the liquid in the bottom of the tubes.
5. Place the tubes in a rack and incubate 45 minutes at 37 degrees Celsius. During this time, you will be shown how to pour your gel for the electrophoresis technique, and your instructor will briefly review DNA structure, restriction enzymes, and gel electrophoresis.
6. Remove your digested DNA samples from the incubator. Using a separate tip for each sample, add 5 microliters of loading dye “LD” into each tube. Cap and spin the tubes to mix.
7. When your gel is ready, place it in the electrophoresis chamber. Fill the chamber with 0.25X TAE buffer to cover the gel. Check to make sure that the wells of the agarose gel are near the black (-) electrode and the base of the gel is near the red (+) electrode.
8. Using a separate tip for each sample, load 20 microliters of each sample into each of 6 wells of the gel in the following order:
Lane 1: S1 Lane 2: S2 Lane 3: S3 Lane 4: S4 Lane 5: S5 Lane 6: CS
9. Place the lid on the electrophoresis chamber. The lid will attach to the base in only one orientation. The red and black jacks on the lid will match with the red and black jacks on the base. Plug the electrodes in to the power supply. DO NOT MOVE YOUR CHAMBER.
10. Turn on the power and electrophorese your samples at 200 V for 40 minutes. Check the electrodes. If tiny bubbles are forming on them, the current is flowing.
11. When the electrophoresis is complete, turn off the power and remove the top of the box. Carefully remove the gel and tray from the gel box. Be careful – the gel is very slippery! Slide the gel into the staining tray.
12. Be certain and wear gloves. Place the blue side of the insta-stain down on the gel. You will stain for approximately 15 minutes.
13. Peel off the DNA Blue InstaStain sheet and destain by adding warm water to the gel and let the gel destain. Agitate slightly and replace very blue water with fresh water. Repeat until bands appear, about 10-15 minutes.
14. Analyze the DNA fingerprint pattern to determine if any of the suspects has DNA matching that was found at the crime scene.
ASSIGNMENT:
Your instructor will assign some or all of these questions for you to analyze.
1. Gregor, Zelda and Ignatz were separated from their parents as infants when Bork and Quanta Globitz were imprisoned by the cruel regime of General Yech. Twenty years of turmoil in Ruritania has caused the loss of all records that could be used to bring parents and children together. Would it be possible to reunite these young adults with their biological parents? Explain in detail, using a narrative.
2. Could DNA fingerprinting be used to determine if two people are siblings? Explain.
3. Virginia's central forensic laboratory has in storage blood and tissue samples collected from more than 100,000 convicted felons. The Chief Pathologist estimates that it would cost about two million dollars to prepare DNA fingerprints for all of them. Would this be a wise expenditure? Explain.
4. Persons now placed under arrest are compelled to be fingerprinted. Do you think that suspects in criminal cases should be compelled to give blood samples for DNA fingerprinting? Explain your view.
Protocol for Using Pipettes
To withdraw and dispense liquids:
1. Attach a tip to the pipette without touching the tip with your hands. To do this, press the narrow end of the pipette directly into a tip as it sits in the box. A gentle, even pressure is all that is necessary to securely attach the tip. Lift the tip from the box with the pipette.
2. Press the control button down to the first stop and hold.
3. Immerse the tip into the liquid.
4. Let the control button glide back slowly and smoothly.
5. Slide the tip out of the liquid along the inside wall of the vessel.
6. To dispense the liquid, hold the tip at an angle against the inside wall of the receiving vessel or gel well.
7. Press the control button slowly down to the second stop and eject the liquid.
8. Continue to hold down the control button and slowly slide the tip out along the inside wall of the vessel.
9. Pull off the tip with your finger.
|