![]()
|
|
|
LAB 10 CORTISOL AND STRESS RESPONSE IN HUMANS
I. Introduction
A. Cortisol
Cortisol is the major glucocorticoid produced in the adrenal cortex. Cortisol is actively involved in the regulation of calcium absorption, blood pressure maintenance, anti-inflammatory function, gluconeogenesis, gastric acid and pepsin secretion, and immune function. Cortisol production has a circadian rhythm. Levels peak in the early morning and drop to the lowest concentration at night. Levels rise independently of circadian rhythm in response to stress .
In the blood only 1 to 15% of cortisol is in its unbound or biologically active form. The remaining cortisol is bound to serum proteins. Unbound serum cortisol enters the saliva via intracellular mechanisms, and in saliva the majority of cortisol remains unbound to protein. Salivary cortisol levels are unaffected by salivary flow rate or salivary enzymes. Studies consistently report high correlations between serum and saliva cortisol, indicating that salivary cortisol levels reliably estimate serum cortisol levels.
B. Stress Response
The definition of stress has assumed a ubiquitous connotation in today’s society. Stress has come to embody almost any factor that induces physiological or psychological tension. The term “stress” was introduced in 1935 by Hans Selye, who explained the phenomenon as nonspecific bodily changes that occurred in response to physically harmful stimuli, or “stressors.”
More recently, stress has come to embody negative effects on the system in which stressors elicit a bodily response perceived as unrest or one that causes anxiety. More appropriately, however, stress is the sum of biological reactions to intrinsic and extrinsic stimuli that results in a perturbation from homeostasis. Stress experienced chronically can have widespread negative effects on a number of physiological systems, including reproduction, growth, metabolism, immune function, and behavior .
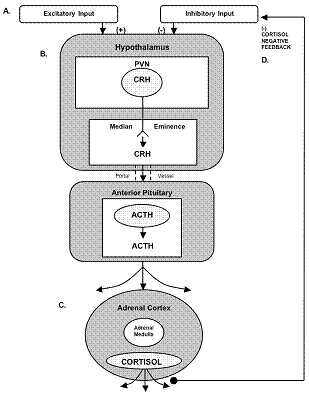
The adaptation to physical or psychological stress usually involves the activation of the hypothalamus-pituitary-adrenal (HPA) axis. The resulting release of hypothalamic corticotropin-releasing hormone, anterior pituitary adrenocorticotropic hormone, and adrenal glucocorticoids (cortisol and corticosterone) in anticipation of or during stressful situations is interpreted as a homeostatic response of the body. During times of stress, the increased metabolic demands of the body can be met through glucocorticoid release.
The bioavailability and metabolic clearance of glucocorticoids are regulated in part by binding globulins. Free, unbound glucocorticoids can enter cells and allow energy mobilization to fuel fight-or-flight responses. The degree and duration of the increase in glucocorticoid concentrations above basal levels are indicative of stress, and greater glucocorticoid concentrations over longer periods of time are interpreted as indicating more stressful situations.
Since ancient times, folk medicine has presented empirical evidence that aromatherapy with essential oils may have physiological and psychological effects. Lavender aroma has particularly been associated with mood relaxation and enhancement. Accompanying the recent development of complementary and alternative medicine, scientific investigation of the effects of aromatherapy have been undertaken. Several studies have suggested that lavender aroma may be associated with improved mood, reduced anxiety or mental stress, sedation, and good sleep. In lab today we will see if we can measure a change in salivary cortisol levels following 10 minutes of lavender exposure.
C. ELISA Theory
A microtitre plate is coated with monoclonal antibodies to cortisol. Cortisol in standards and unknowns competes with cortisol linked to horseradish peroxidase for the antibody binding sites. After incubation, unbound components are washed away. Bound cortisol peroxidase is measured by the reaction of the peroxidase enzyme on the substrate tetramethylbenzidine (TMB). This reaction produces a blue color. A yellow color is formed after stopping the reaction with sulfuric acid. Optical density is read on a standard plate reader at 450 nm. The amount of cortisol peroxidase de-tected, as measured by the intensity of color, is inversely proportional to the amount of cortisol present.
II. Objectives:
1. Learn how to perform an ELISA for cortisol
2. Learn how to determine the cortisol concentration by plotting a standard curve from reference standards.
3. The correlate the plasma levels of cortisol to different stressful situations and appreciate the role of cortisol in stress biology
III. Methods
There are a number of ways to design an experiment to measure variations in salivary cortisol levels via ELISA. Ideally, there would be a large population of students that could be randomly selected. Because of time restrictions and the limited number of students available for testing, each student will have three samples taken: Control, Relaxed, Stressed. The instructor will explain the conditions under which the saliva samples will be taken. To get the best data from these procedures students should have no alcohol for 12 hours before lab, no food for 1.5 hours before lab and they should rinse their mouth completely with water 10 minutes before collection of samples.
EXPERIMENTAL DESIGN MATRIX FOR SALIVA SAMPLES
Much of today’s lab will involve learning how to perform an ELISA. Pipetting is very critical to good results. As a result, students will collect their own saliva samples, but one student (or the instructor) will do all the loading of the wells in the ELISA 96-well plate. Below is an overview of the ELISA procedure:
1. Bring all reagents to room temperature and mix before use. 2. Prepare 1X wash buffer (and reconstitute stop solution, if appropriate). 3. Bring plate to room temperature and prepare for use with NSB wells. 4. Prepare tube with 24 mL of assay diluent for conjugate dilution, which will be made later. 5. Pipette 25 μL of standards, controls, and unknowns into appropriate wells. 6. Pipette 25 μL of assay diluent into zero and NSB wells. 7. Make final 1:1600 dilution of conjugate (15 μL into 24 mL assay diluent), mix, and immediately pipette 200 μL into each well. 8. Mix plate for 5 minutes at 500 rpm. Incubate for an additional 55 minutes at room temperature. 9. Wash plate 4 times with 1X wash buffer. Blot. Wash involves pipetting in 300 ul, then inverting plate 4 times 10. Add 200 μL TMB solution to each well. 11. Mix plate for 5 minutes at 500 rpm. Incubate in dark at room temperature for 25 additional minutes. 12. Add 50 μL stop solution to each well. Mix for 3 minutes at 500 rpm. 13. Wipe plate bottom clean and read within 10 minutes of adding stop.
Detailed Procedure
Step 1: Determine your plate layout. Here is a suggested layout which has two replicate samples from each of the different conditions a given student will be under. Note, the class can determine different experimental design layouts if you wish.
Different Students Standards 1 2 3 4 5 6 7 8 9 10
Step 2: Keep the desired number of strips in the strip holder and place the remaining strips back in the foil pouch. If you choose to place non-specific binding wells in H-1, 2, remove strips 1 and 2 from the strip holder and break off the bottom wells. Place the strips back into the strip holder leaving H-1, 2 blank.
Break off 2 NSB wells from the strip of NSBs included in the foil pouch. Place in H-1, 2. Alternatively, NSBs may be placed wherever you choose on the plate. Reseal the zip-lock foil pouch containing unused wells and desiccant. Store at 2-8°C. Caution: Extra NSB wells should not be used for determination of standards, con-trols or unknowns.
Step 3: Pipette 24 mL of assay diluent into a disposable tube. Set aside for Step 5.
Step 4: Pipette 25 μL of standards, controls, and unknowns into appropriate wells. Standards, controls, and unknowns should be assayed in duplicate. Pipette 25 μL of assay diluent into 2 wells to serve as the zero value. Pipette 25 μL of assay diluent into each NSB well.
Note: To ensure highest quality assay results, pipetting of samples and reagents must be done as quickly as possible (without interruption) across the plate. Ideally, the process should be completed within 20 minutes or less.
Step 5: Make a 1:1600 dilution of the conjugate by adding 15 μL of the conjugate to the 24 mL of assay diluent prepared in Step 3. (Scale down proportionally if not using the entire plate.) Immediately mix the diluted conjugate solution and pipette 200 μL into each well using a multichannel pipette.
Step 6: Mix plate on rotator for 5 minutes at 500 rpm (or tap to mix) and incubate at room temperature for an additional 55 minutes.
Step 7: Wash the plate 4 times with 1X wash buffer. A plate washer is recommended. However, washing may be done by gently squirting wash buffer into each well with a squirt bottle, or by pipetting 300 μL of wash buffer into each well, and then discarding the liquid by inverting the plate over a sink. After each wash, the plate should be thoroughly blotted on paper towels before being turned upright. If using a plate washer, blotting is still recommended after the last wash, just before the addition of the TMB.
Step 8: Add 200 μL of TMB solution to each well with a multichannel pipette.
Step 9: Mix on a plate rotator for 5 minutes at 500 rpm (or tap to mix) and incubate the plate in the dark at room temperature for an additional 25 minutes.
Step 10: Add 50 μL of stop solution with a multichannel pipette.
Step 11: Mix on a plate rotator for 3 minutes at 500 rpm (or tap to mix).
Caution: Spillage may occur if mixing speed exceeds 600 rpm. Wipe off bottom of plate with a water-moistened, lint-free cloth and wipe dry.
Read in a plate reader at 450 nm. Read plate within 10 minutes of adding stop solution. (Correction at 490 to 630 is desirable.)
Samples with cortisol values greater than 3.0 μg/dL (82.77 nmol/L) should be diluted with assay diluent and rerun for accurate results. To obtain the final cortisol concen-tration, multiply the concentration of the diluted sample by the dilution factor.
Record Class Data Below:
III. Questions/Analysis
1. Run an ANOVA on class data to look for significance. What are the problems with using an ANOVA analysis with this data set, how could you improve manipulating the data for a more accurate analysis?
IV. Materials
2. Precision pipette to deliver 15 and 25 μL 3. Precision multichannel pipette to deliver 50 μL and 200 μL 4. Vortex 5. Plate rotator with 0.08-0.17 inch orbit (if unavailable, tap plate to mix) 6. Plate reader with a 450 nm filter 7. Log-linear graph paper or computer software for data reduction 8. Deionized water 9. Reagent reservoirs 10. One disposable tube capable of holding 24 mL 11. Pipette tips 12. Serological pipette to deliver up to 24 mL 13. Natural Lavender oil and spray 14. Short straws and microfuge tubes/microfuge for sample collection
Notes on Procedure:
1. A pH indicator in the assay diluent alerts the user to samples with high or low pH val-ues. Acidic samples will turn the diluent yellow. Alkaline samples will turn the dilu-ent purple. Dark yellow or purple wells indicate that a pH value for that sample should be obtained using pH strips. Cortisol values from samples with a pH ≤3.5 or ≥ 9.0 may be artificially inflated or lowered (14).
2. Avoid sample collection within 60 minutes after eating a major meal or within 12 hours after consuming alcohol. Bovine hormones normally present in dairy products can cross-react with anti-cortisol antibodies and cause false results. Acidic or high sugar foods can compromise assay performance by lowering sample pH and influencing bacterial growth. To minimize these factors, rinse mouth thoroughly with water 10 minutes before sample is collected.
3. Students may collect whole saliva by tilting the head forward, allowing the saliva to pool on the floor of the mouth, then passing the saliva through a short straw into a polypropylene vial. Another method is to use the Salimetrics Oral Swab (SOS).
4. Bring all reagents to room temperature and mix before use. A minimum of 1.5 hours is necessary for the 24 mL of assay diluent used in Step 5 (conjugate dilution) to come to room temperature. Bring microtitre plate to room temperature before use. It is important to keep the zip-lock pouch with the plate strips closed until warmed to room temperature as humidity may have an effect on the coated wells.
5. Prepare 1X wash buffer by diluting wash buffer concentrate 10-fold with room-temperature deionized water (100 mL of 10X wash buffer to 900 mL of deionized H2O). Dilute only enough for current day’s use, and discard any leftover re-agent. (If precipitate has formed in the concentrated wash buffer, it may be heated to 40°C for 15 minutes. Cool to room temperature before use in assay.)
6. Reconstitute powdered stop solution (if appropriate) by adding 12.5 mL deion-ized water. Let sit for 10 minutes before use. 10
7. This kit uses break-apart microtitre strips. You may run less than a full plate. Unused wells must be stored at 2-8°C in the sealed foil pouch with desiccant and used in the frame provided. The quantity of reagent provided with this kit is sufficient for three partial runs. The volumes of wash buffer and conjugate prepared for assays using less than a full plate should be scaled down accordingly, keeping the same dilution ratio.
8. The temperature of the laboratory may affect assays. Salimetrics’ kits have been validated at 68-74ºF (20-23.3ºC). Higher or lower temperatures will cause an increase or decrease in OD values, respectively. Avoid microbial contamination of opened reagents. Salimetrics recommends using opened reagents within one month. Store all reagents at 2-8°C.
| ||||||||||||||||||||||||||||||||||||||||||||||||||||||||||||||||||||||||||||||||||||||||||||||||||||||||||||||||||||||||||||||||||||||||||||||||||||||||||||||||||||||||||||||||||||||||||||||||||||